Configure Your Email DNS to Help Deliverability Rates
Free Trial users do NOT need to configure email DNS settings, they have already been configured for the duration of your free trial period. Once your free trial ends, you’ll need to complete the process outlined below.
Before you can send an email campaign from Boingnet, you’ll need to configure your domain’s email DNS settings for Boingnet. This extra step will increase your email deliverability so your emails will be delivered to your recipients’ in-boxes instead of their spam boxes. The domain you use should be dedicated to your Boingnet campaigns, it should not be used for any other purpose or to receive email, and it should not be the domain used for your website. If you have a Boingnet Agency account, you can configure a different email domain for each of your sub-accounts.
If you purchase and register your email domain through Boingnet, then you do not need to configure these DNS records, these updates are automatically made for you.
For external domains – that is those registered through a separate service such as GoDaddy or Network Solutions – you’ll need to make the following email DNS updates. The examples below show you how to update a Go Daddy domain and a Network Solutions domain. Other domain providers offer very similar interfaces to make DNS changes. If you are struggling with the below changes, send us a note at support@boingnet.com or call us at (800) 264-6420 and we can walk you through any questions you may have.
Configure Your Email DNS for SendGrid
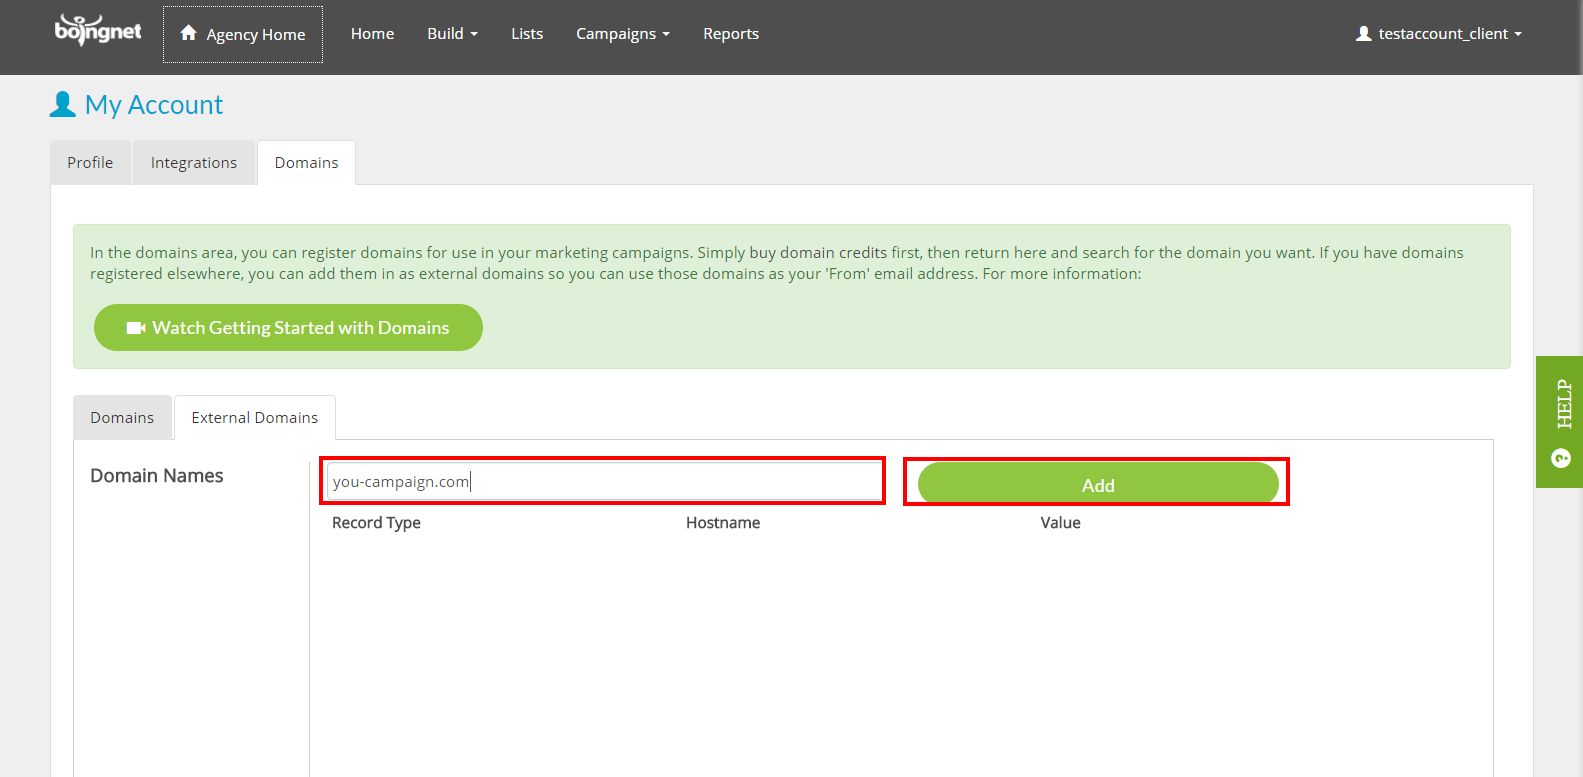
In order to do this, log into your Boingnet account and go to the ‘Domains‘ section under profile:
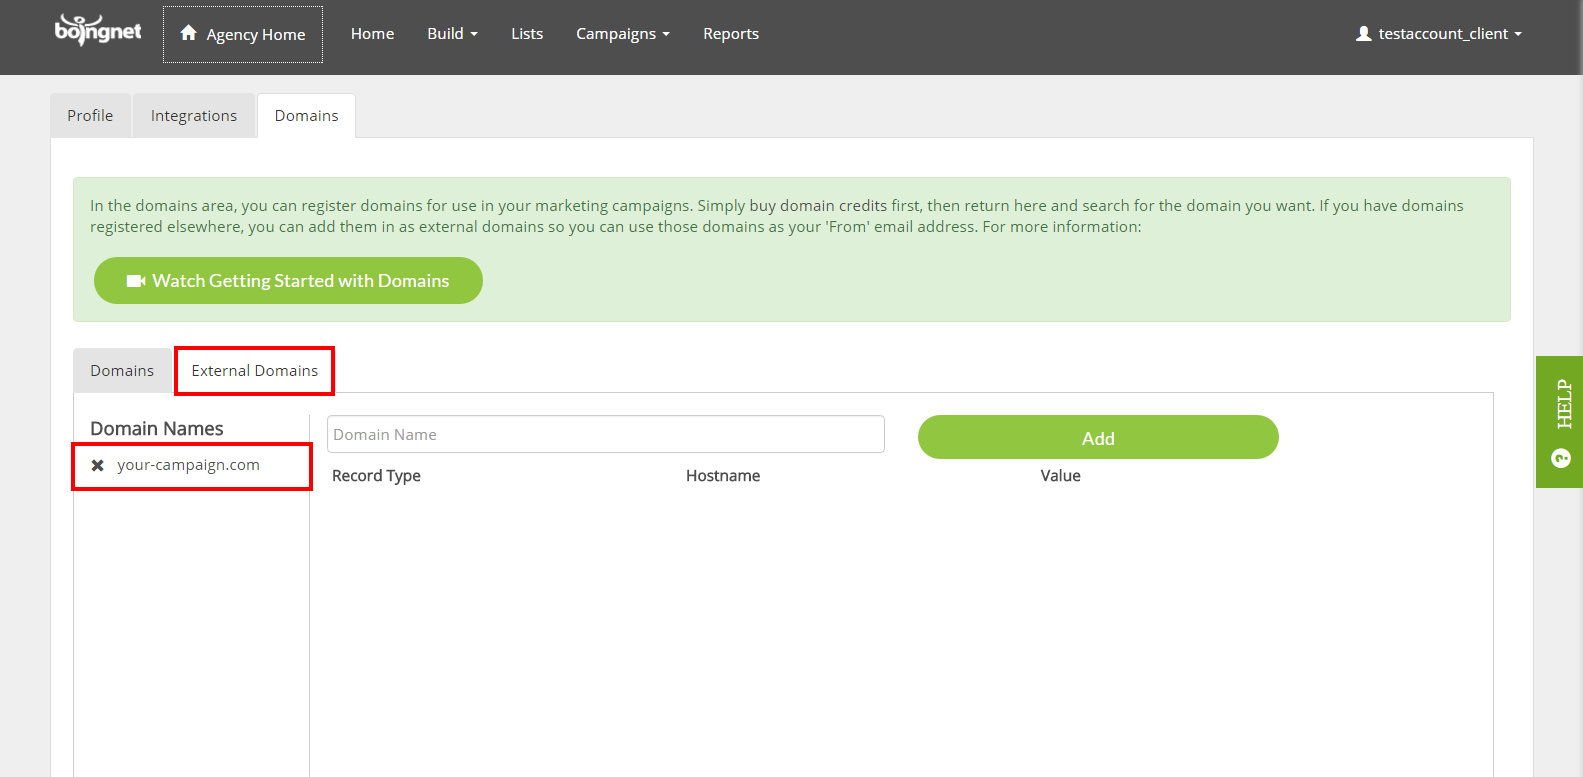
Once you reach the Domains page, click on the ‘External Domains‘ Tab. This will bring you to a page where you can manage all of your external domains.
If you have not yet added your external domain, enter it into the box provided and click the Add button.:
Once your external domain has been added to your account, it will appear underneath the External Domains Tab:
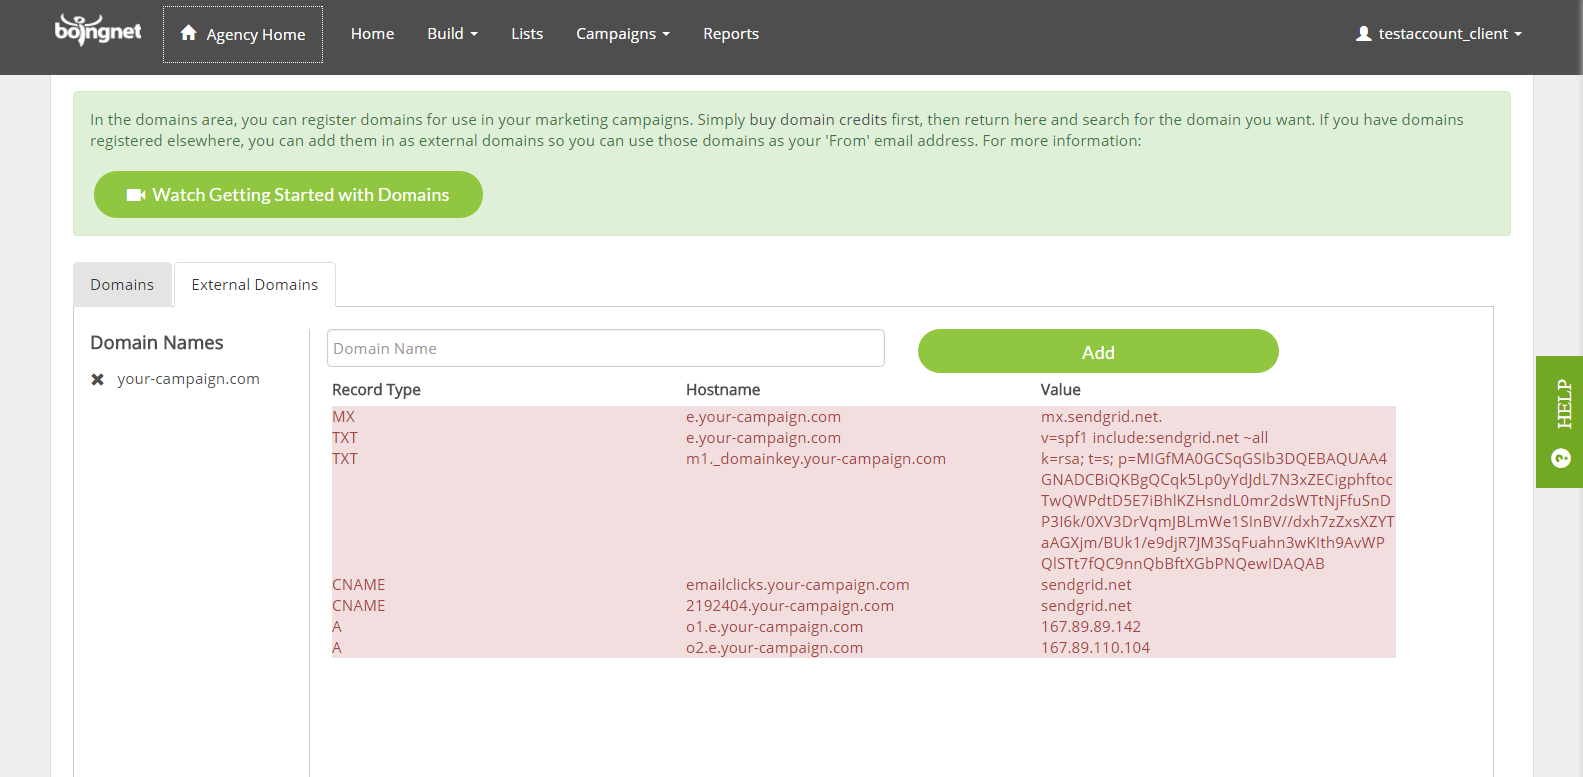
The system will determine the configuration of the email DNS records that need to be added at your domain’s registrar. Click on your domain and the Record Type, Hostname, and Value for each record you will need to configure will display. It may take several seconds for this information to appear:
The records displayed above show the 7 records that will need to be configured on your domain registrar (GoDaddy, Network Solutions etc) in order for you to send email through Boingnet:
- 2 TXT Records
- 2 CNAME Records
- 2 A Records
- 1 MX Record
If your Domains Page displays this information in red, either these records have not yet been configured, or your domain registrar has not yet processed these updates. Once you have configured these records and your domain registrar has made these updates, these records will be highlighted in green.
Please Note: ALL 7 records must be accurately configured.
To Configure your Email DNS records:
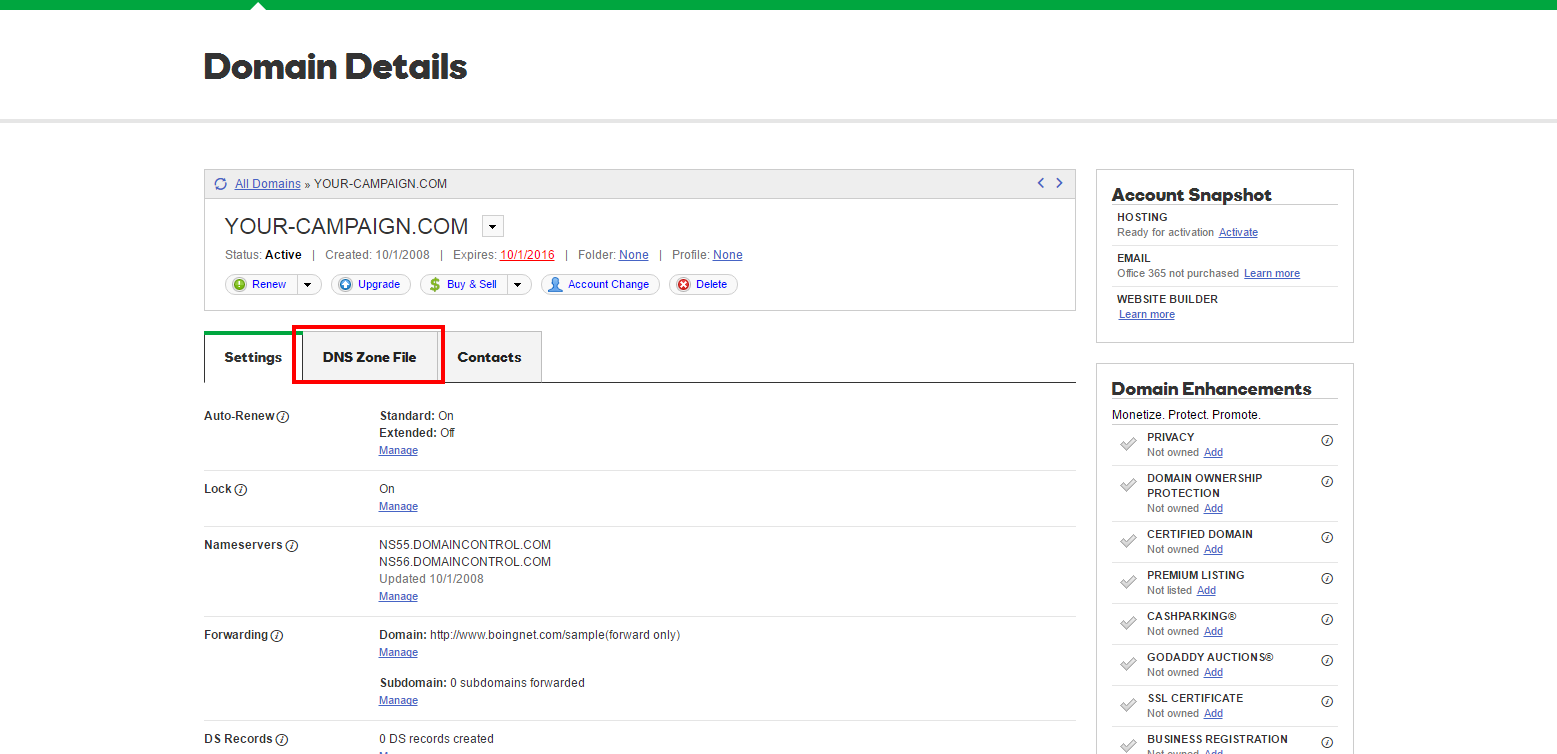
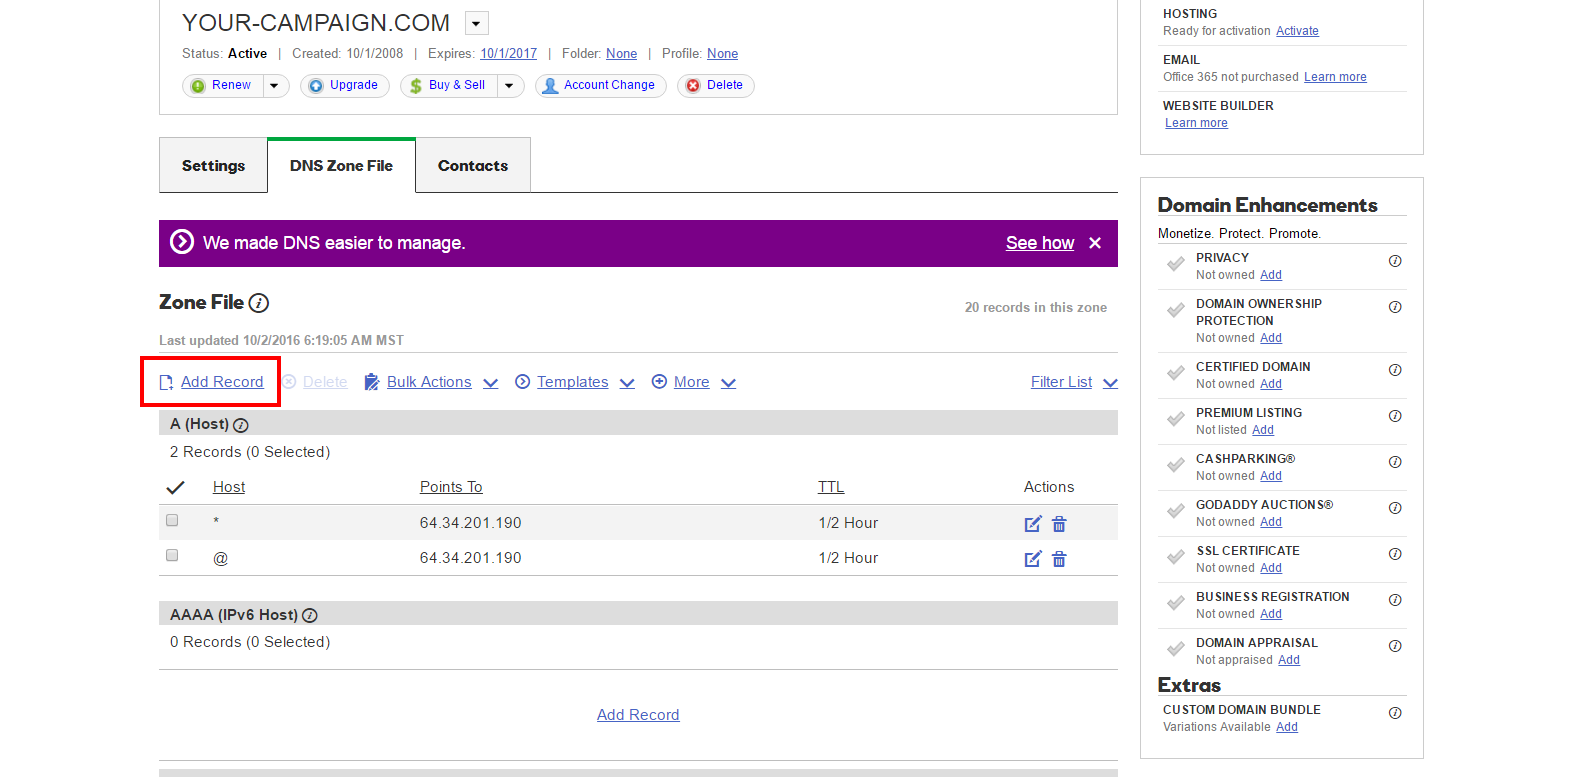
In the example below, we are using Go Daddy. Log into your GoDaddy account and select the DNS Zone File tab:
The next step is to add the 7 records displayed on your Boingnet Domains Tab to GoDdaddy by clicking Add Record:
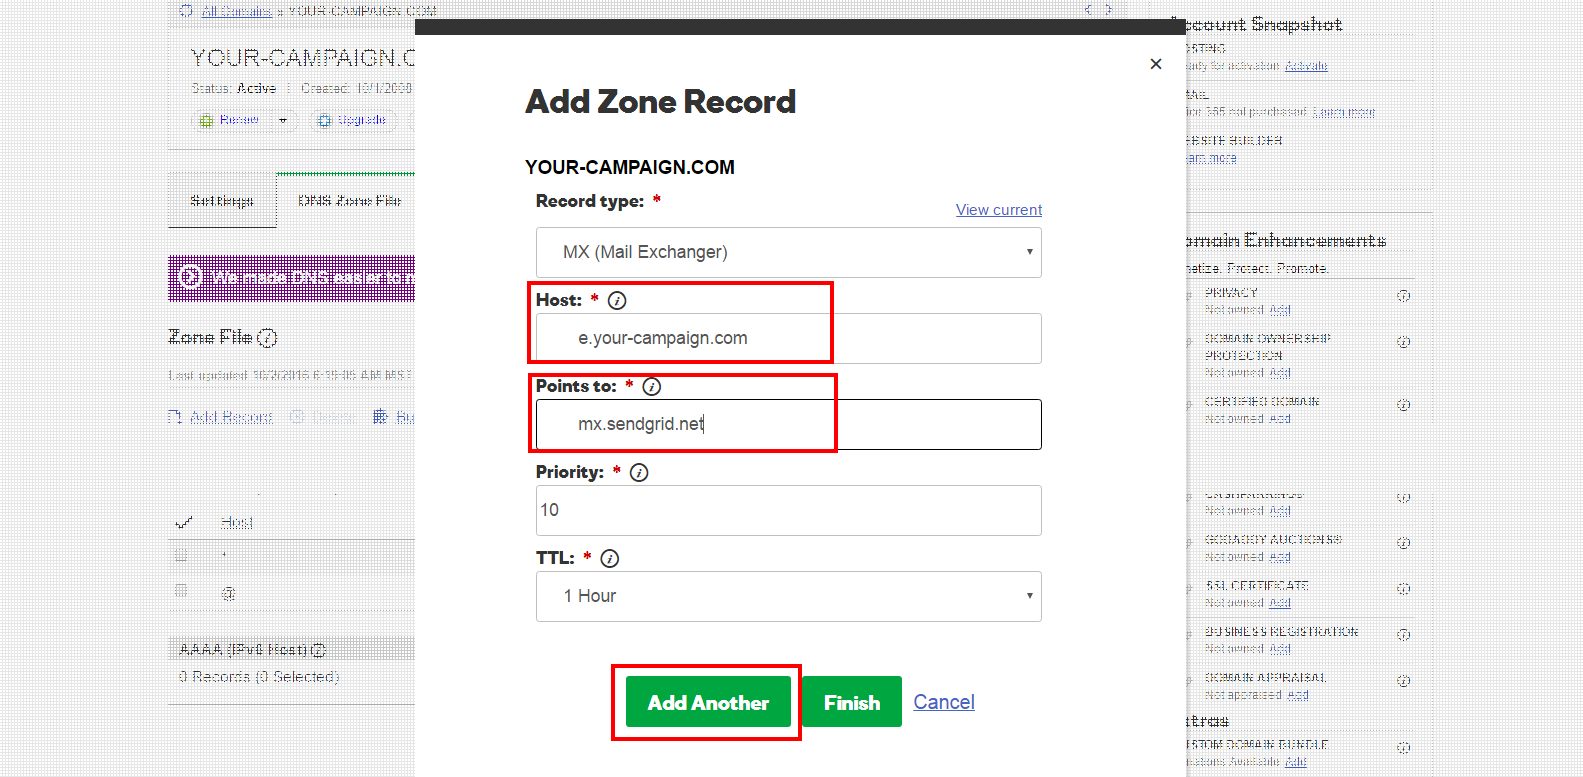
After clicking Add Record, the Add Zone Record form will be displayed:
To Add the MX Record:
- Select Record type (MX)
- Copy and paste the Hostname for the MX record directly from your Boingnet Domains Page
- Copy and paste the Value that correlates with that Hostname
- Set the Priority to 10
- leave TTL as 1 hour
Once this is completed, select Add Another to add the first TXT record using the same copy and paste method to populate the Hostname and Value from your Boingnet Domains Page.
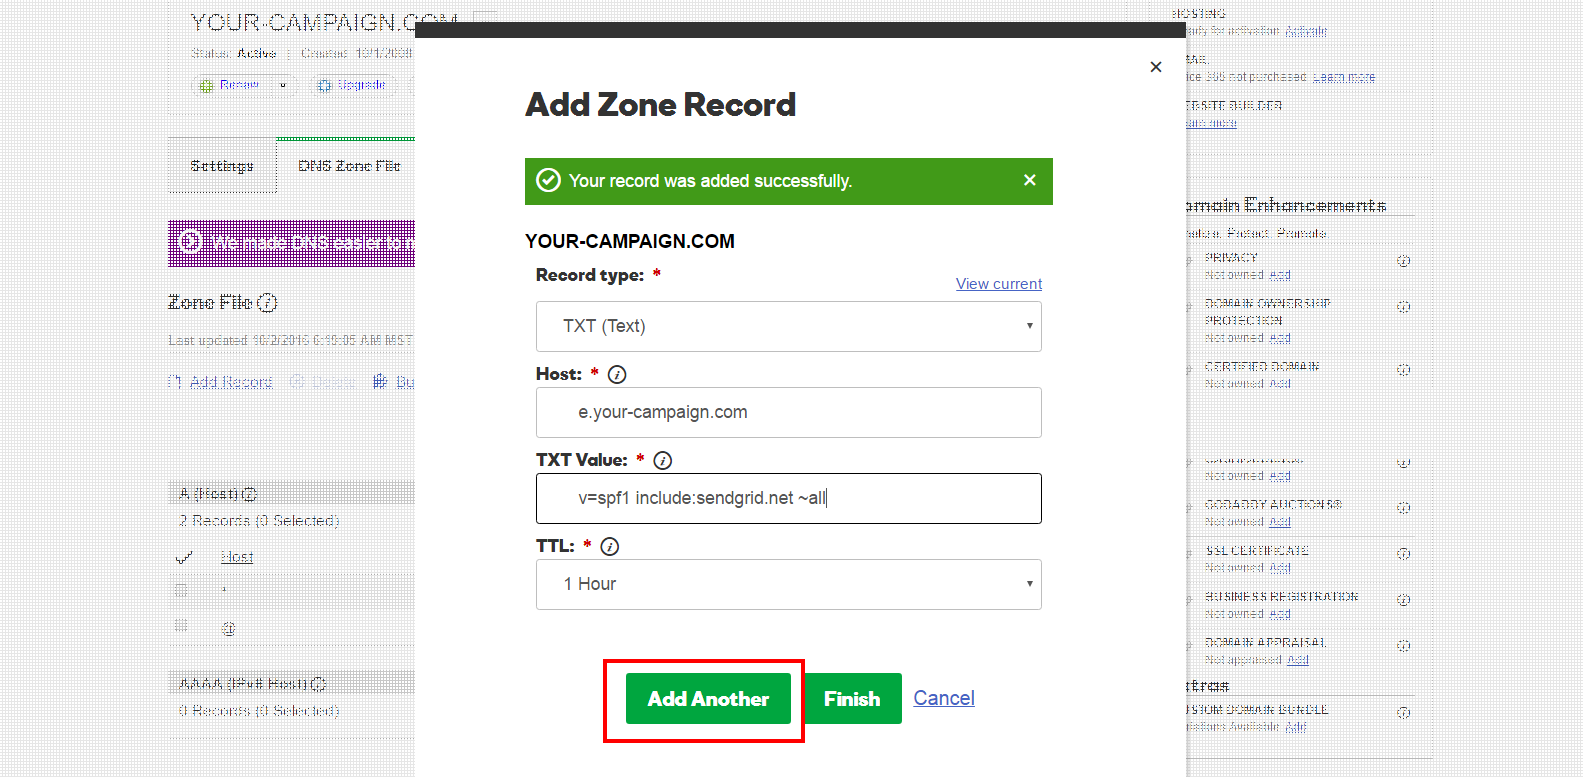
To Add the first TXT Record:
- Select Record type (TXT)
- Copy and paste the Hostname for the first TXT record directly your Boingnet Domains Page
- Copy and paste the Value that correlates with that Hostname
- leave TTL as 1 hour
Once this is completed, select Add Another to add the second TXT record using the same copy and paste method to populate the Hostname and Value from your Boingnet Domains Page.
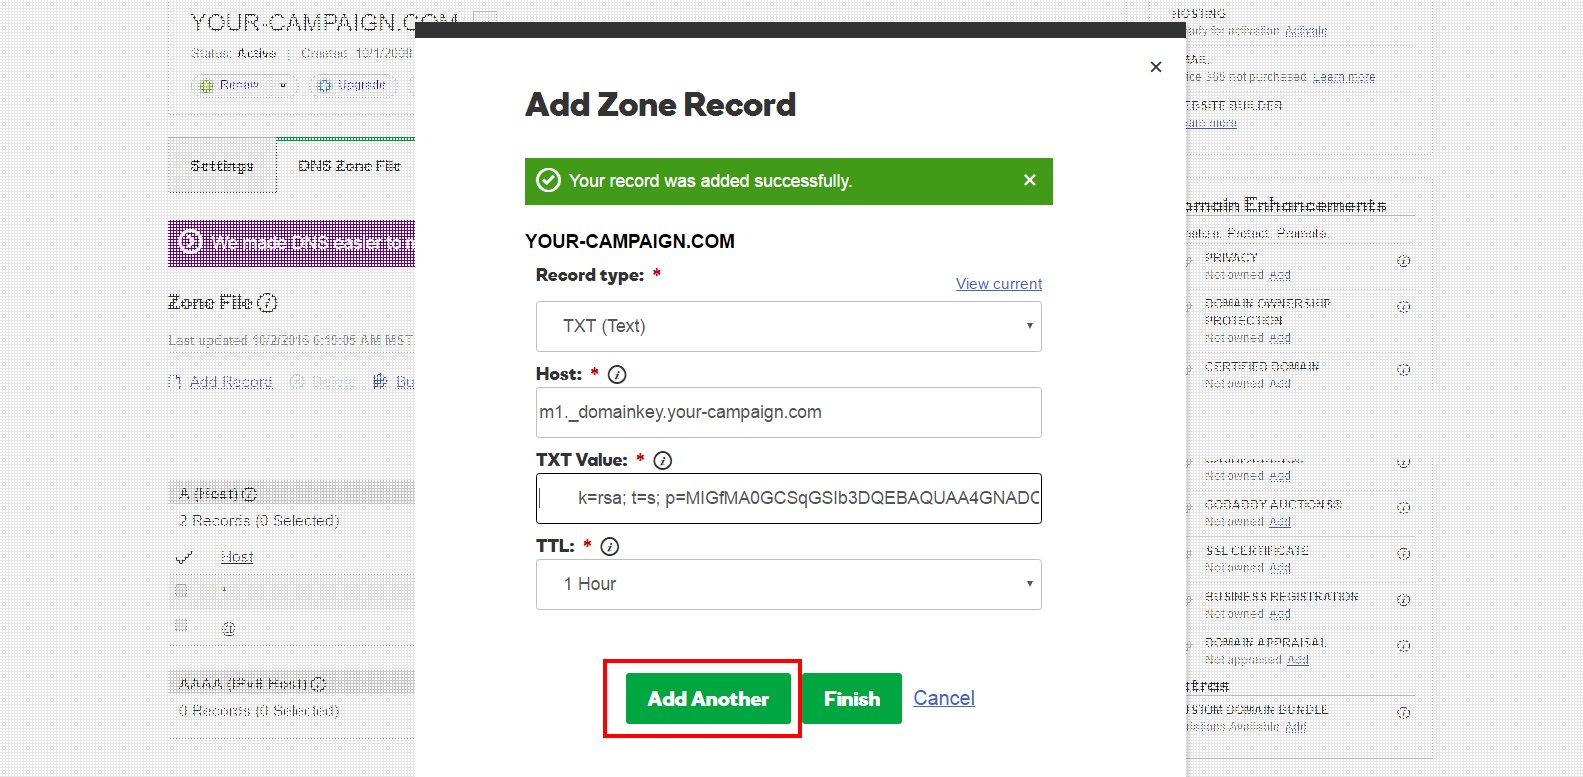
To Add the second TXT Record:
- Select Record type (TXT)
- Copy and paste the Hostname for the second TXT record directly from your Boingnet Domains Page
- Copy and paste the Value that correlates with that Hostname
- leave TTL as 1 hour
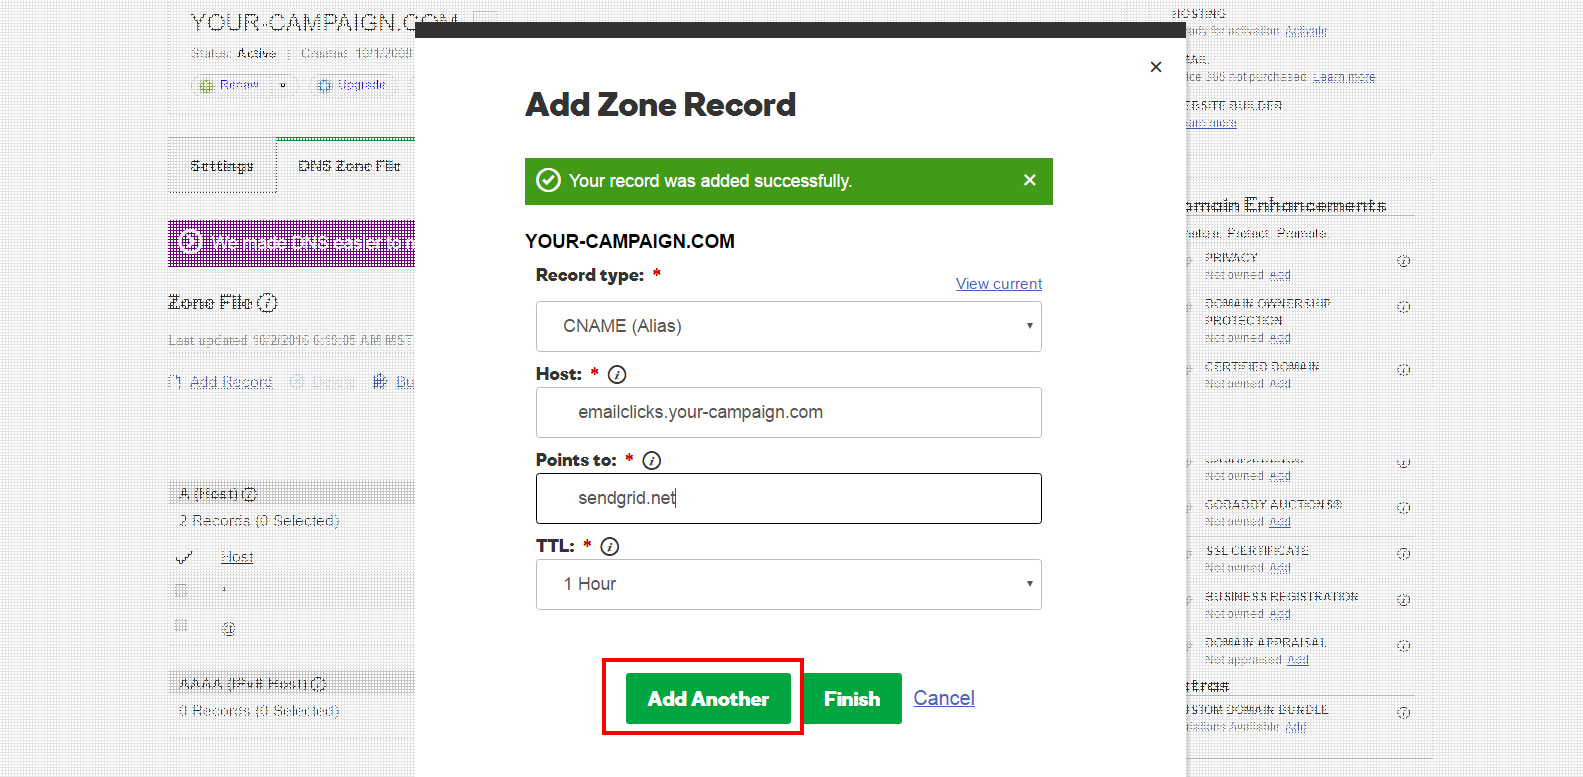
Once this is completed, select Add Another to add the first CNAME record using the same copy and paste method to populate the Hostname and Value from your Boingnet Domains Page:
To Add the first CNAME Record:
- Select Record type (CNAME)
- Copy and paste the Hostname for the first CNAME record directly from your Boingnet Domains Page
- Copy and paste the Value that correlates with that Hostname
- leave TTL as 1 hour
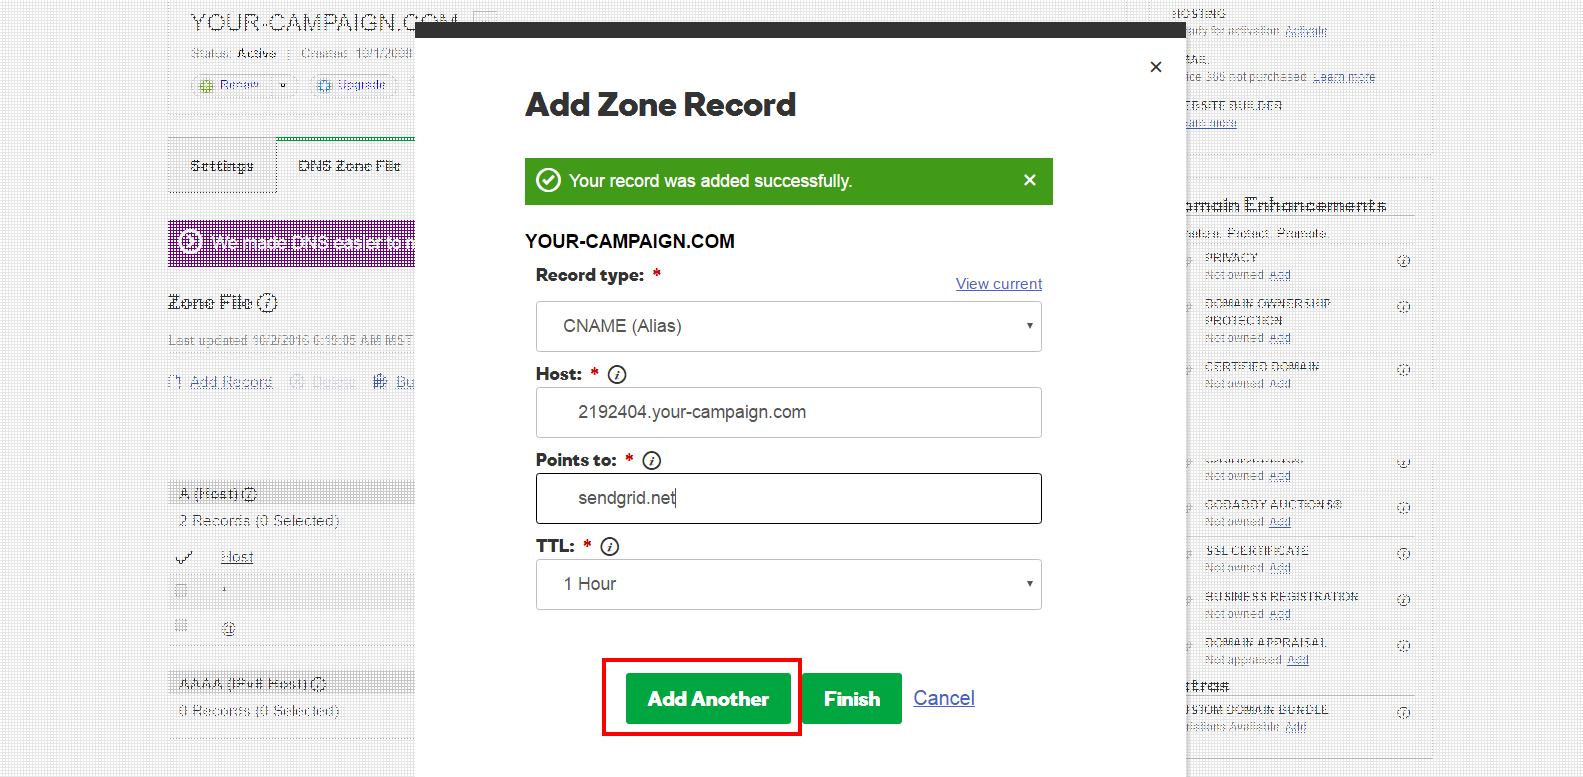
- Once this is completed, select Add Another to add the second CNAME record using the same copy and paste method to populate the Hostname and Value from your Boingnet Domains Page:
To Add the second CNAME Record:
- Select Record type (CNAME)
- Copy and paste the Hostname for the second CNAME record directly from your Boingnet Domains Page
- Copy and paste the Value that correlates with that Hostname
- leave TTL as 1 hour
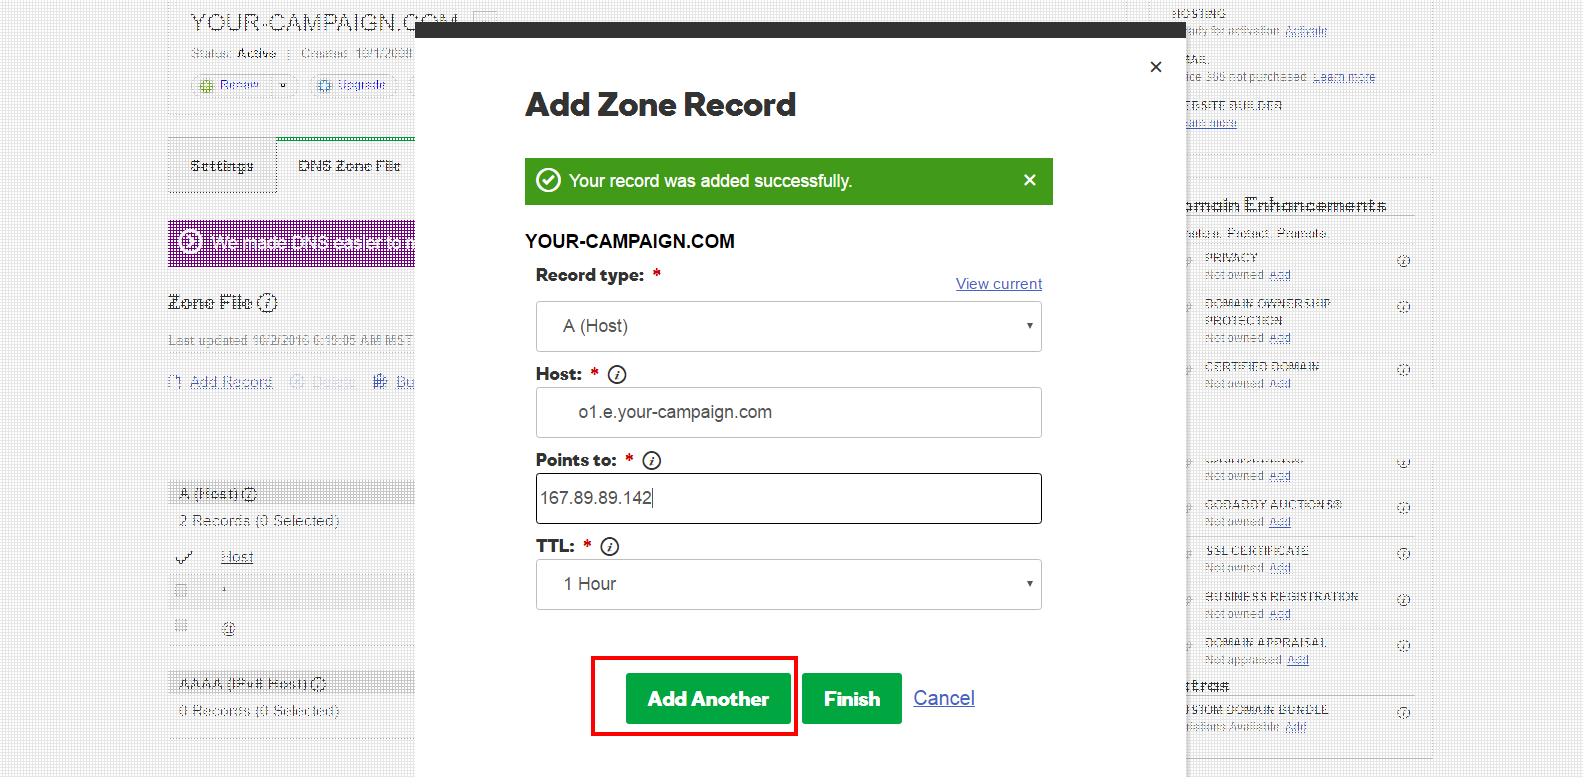
- Once this is completed, select Add Another to add the first A record using the same copy and paste method to populate the Hostname and Value from your Boingnet Domains Page:
To Add the first A Record:
- Select Record type (A)
- Copy and paste the Hostname for the first A record directly from your Boingnet Domains Page
- Copy and paste the Value that correlates with that Hostname
- leave TTL as 1 hour
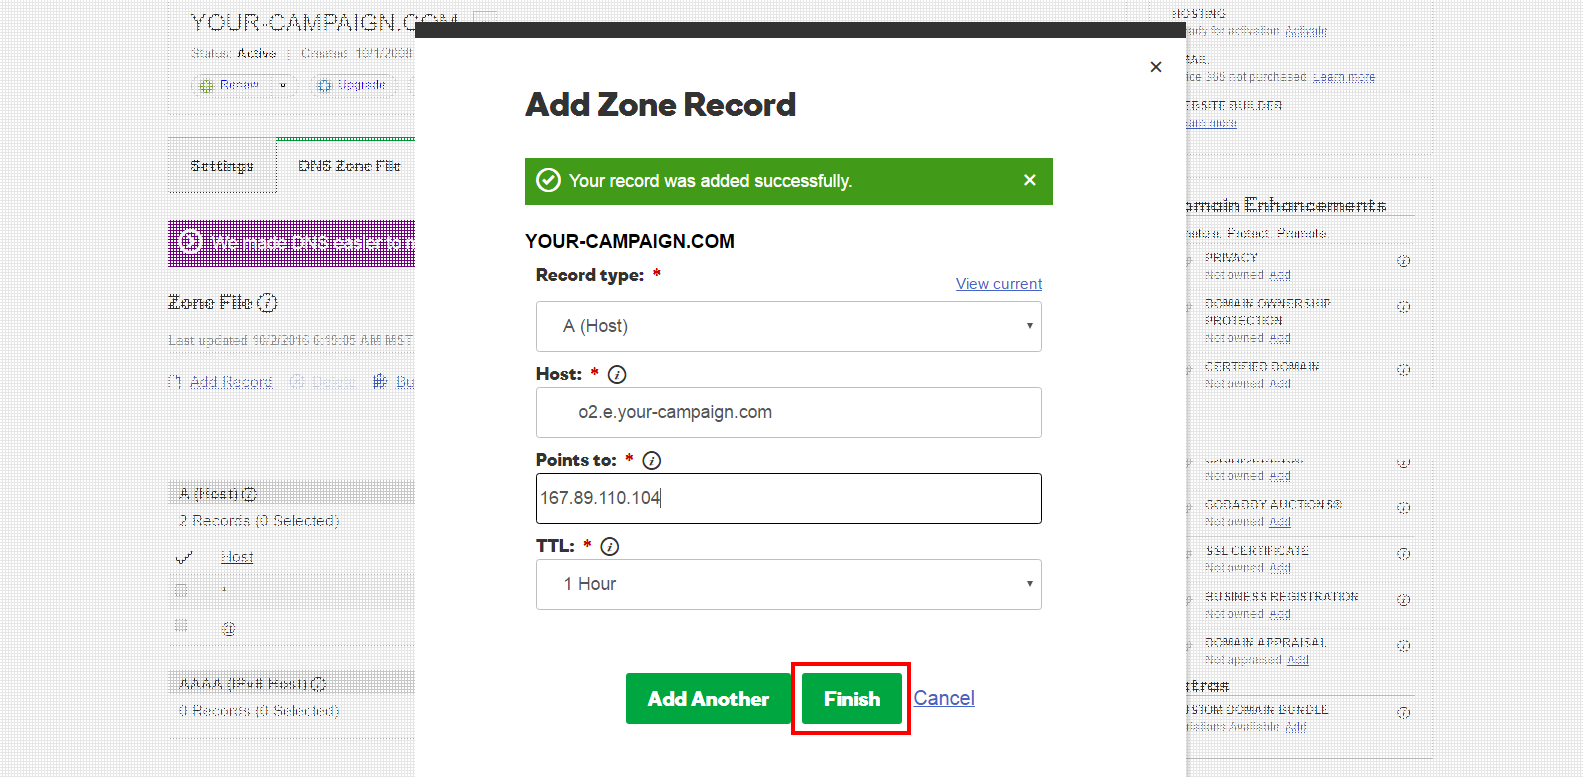
- Once this is completed, select Add Another to add the second A record using the same copy and paste method to populate the Hostname and Value from your Boingnet Domains Page:
To Add the second A Record:
- Select Record type (A)
- Copy and paste the Hostname for the second A record directly from your Boingnet Domains Page
- Copy and paste the Value that correlates with that Hostname
- leave TTL as 1 hour
- Once this is completed, click Finish. GoDaddy will also require that you save your changes, so make sure you also click SAVE.
Please note: It can take most domain registrars, including GoDaddy and Network Solutions at least 24 – 48 hours to process these changes. At that point, your Domains Page will display these records highlighted in green and you’ll be ready to send email through your Boingnet account.
Contact Our Support Forums for Help
We are perpetually seeking to evolve our product as well as our support process. If you didn't find your answer here take a moment to visit our support forums as well as submit your ideas on how we can bring Boingnet to the next level!
Support Forums


