

Facebook Remarketing in Boingnet – Liz’s Tips
 Facebook Remarketing. You may have heard of it before. And chances are, you’ve experienced it first hand in your personal life.
For example, have you ever looked at a product while shopping online only to see it advertised on Facebook minutes later? No, it’s not magic. That’s remarketing (also known as retargeting). And I’m here to show you how you can do it in Boingnet.
First, let me explain how Facebook remarketing works.
When you visit any site with Facebook’s special remarketing code embedded within it (including landing pages and microsites), you are flagged as a potential customer – even if you don’t convert or buy anything. Then, when you go to Facebook later, the code now embedded on your device in the form of a cookie tells Facebook to display ads that promote the exact product or offer you were just checking out.
So even though you didn’t convert, the site still has a chance to turn you into a customer well after you leave their site. Pretty cool, huh?
Facebook Remarketing: A Second Chance to Make a First Impression

Image courtesy of Bass.gr
You spend so much time and effort trying to get people to visit your site. You write blogs, emails, eBooks, and troves of other compelling content to promote your products and/or services. You’re heavy into SEO and SEM, and do your best to provide the right messaging and positioning to compel your visitors to buy, download, or click. But still, only a very small percentage of your visitors wind up converting.
Facebook remarketing capabilities give you a second chance – a second chance to engage, a second chance to promote, and most importantly, a second chance to convert a visitor into a customer.
Facebook Remarketing Pixel: Not as Technical as it sounds.
Facebook Remarketing Pixel
As I mentioned earlier, implementing a Facebook retargeting strategy means you’re going to have to deal with some code. But it doesn’t mean you have to be a programmer to work with this code. In fact, if you know how to copy and paste, you can set the whole thing up in Boingnet without ever having to call IT. More on that later.
In Facebook, the retargeting code I mentioned is referred to as a “pixel”. There are two types of pixels in Facebook remarketing – an audience pixel and a conversion pixel. The audience pixel is what you use to track people who have visited your site. The conversion pixel is used to track ROI from returning customer conversions (downloads, purchases, clicks – whatever you ultimately want the prospect to do).
You get the pixels from within the ad manager in Facebook, but you can only get one of each pixel type per account that you use across all of your advertising (even if you have multiple websites).
The Facebook Remarketing Audience Pixel
The audience pixel is the first thing you want to get setup in Facebook. Tracking won’t start until you have it in place on your site, so the earlier you get it setup, the better off you’ll be. You can start gathering your audience well before your campaign is fully ready.
1. How to Generate a Facebook Remarketing Pixel
- Go to “Ads Manager” in Facebook
- Go to “Tools” in the top navigation and select “Pixels” > “Facebook Pixel”
- Click “Create a Pixel”
- Name your Pixel. There’s only one pixel per ad account, so choose a name that represents your business.
- Click Create Pixel.
- Copy the pixel. If you plan on doing the rest later, have the pixel emailed to you.
2. How to Add the Facebook Remarketing Pixel to a Boingnet Microsite
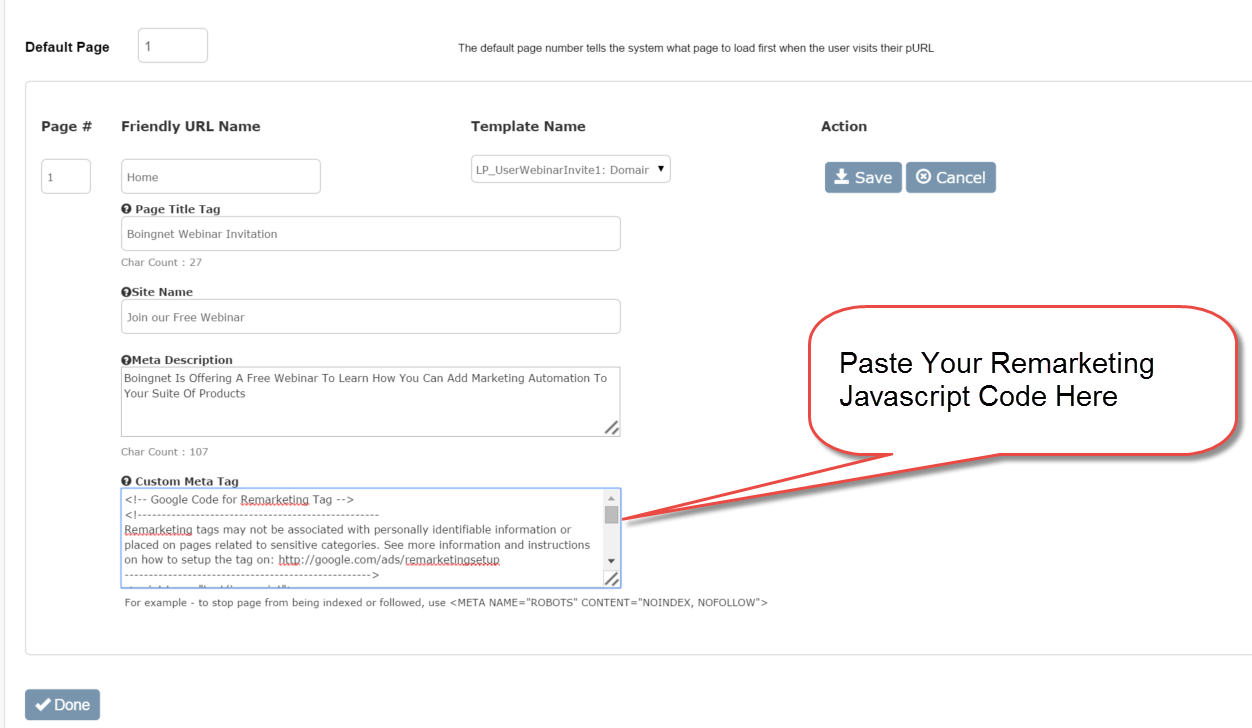
Boingnet’s Custom Meta Tag simplifies the process for adding Facebook remarketing code.
Remember when I said you don’t have to be a programmer to do this? Here’s where we at Boingnet have really simplified the process for you. Normally, you would have to take this pixel (javascript code) and place it within the header tags of the pages you want to track.
In Boingnet, we’ve simplified the technical work down to make it as easy as possible for you to implement – and you never have to touch any source code. The microsite can be a pURL or on a generic URL – it works exactly the same.
- Go to “Build” in the top navigation
- Select “Microsites”
- Find the microsite you want to track*
- Hover over the Blue action button and click “Edit”
- Identify which page you want to track within microsite
- Click “Edit”
- Paste the Facebook pixel in the Custom Meta Tag field
*If you are building a microsite for the first time, we recommend you check out this page before doing anything
When a user drops their remarketing code into this field, Boingnet automatically inserts it into the HTML of their page. You can also include other types of tracking code here, such as Google Analytics.
3. How to Create an Audience for Facebook Remarketing
- Go to “Tools” in the top navigation and select “Audiences”
- Click on the blue button at the top of the screen that says “Create audience” and select “custom audience” from the dropdown
- Select the “website traffic” option and then select the audience to be for “anyone who visits your website”. You can choose to track specific pages of your site for a more targeted approach.
- Give the audience a name
- Create Audience
4. How to Create the Perfect Facebook Remarketing Ad
The best way to learn how to create Facebook ads effectively is to just try it. So start small, watch what is working, and double down on the winners.
1. Click on the green “Create Ad” Button
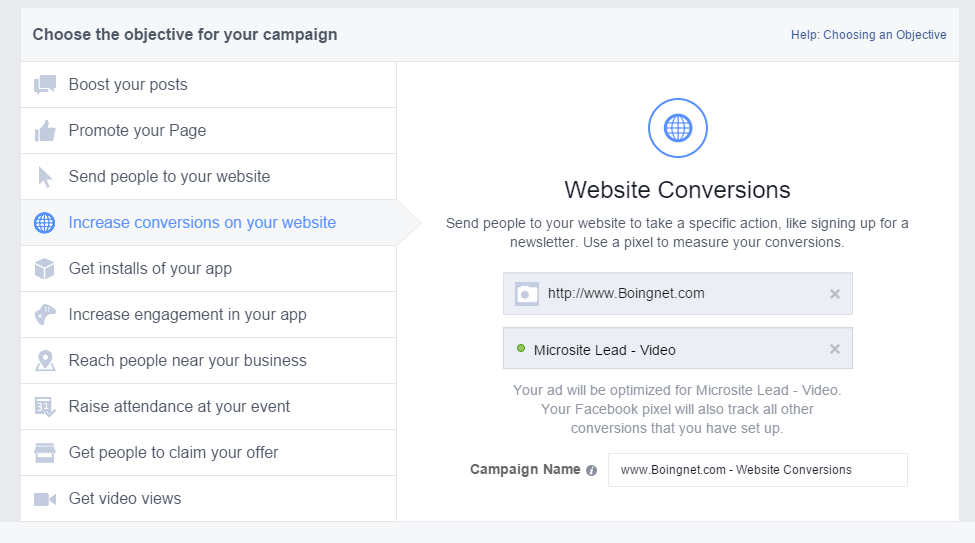
Your advertising objective is what you want people to do when they see your ads. For example, you can create ads to get people to like your Facebook Page which is different than creating ads to encourage people to visit your website.
2. Choose your objective. There are a number of objectives you can choose from. Which one you select will affect the layout and behavior of your ad. For sake of example, I selected “Send people to your website”.
3. Enter the URL that you want to promote
4. If you haven’t already done so, make sure your Facebook pixel is in place.
5. Set Audience and Budget
6. Create or select a custom Audience. If you’ve already created an audience, Facebook will offer all your current audience lists in a drop down.
7. Add detailed targeting if necessary (This allows you to only target users with certain interests. But don’t get too specific or your
target pool will shrink and be less effective).
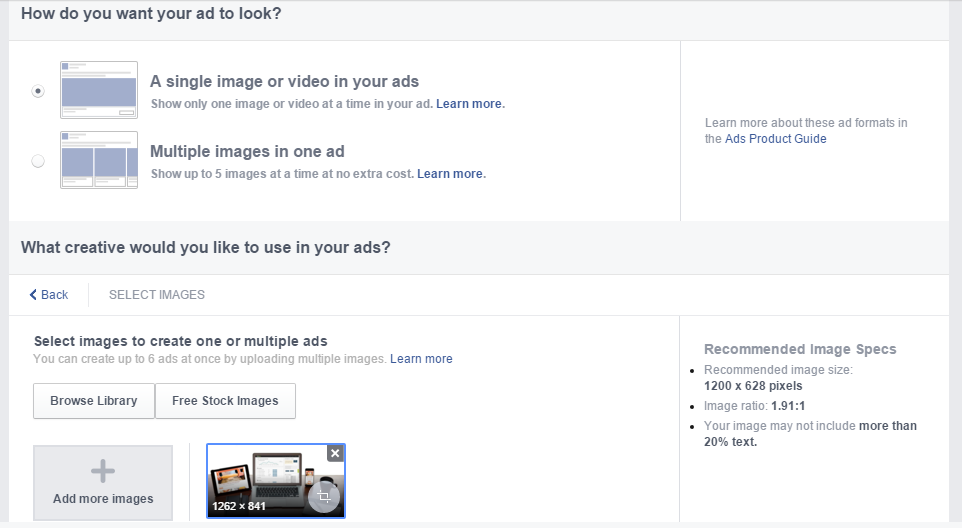
In this section, select a single image or video in your ads. Or you can use multiple images in one ad.
8. Set your Daily Budget – start low at $5-$10 dollars a day. You can gradually increase the number over time as metrics start trickling in.
9. Choose your ad layout – you can select to display one image, multiple images, or even a video.
10. Upload your image(s). For best results, select an image that is 1200 x 628 pixels.
Now that everything is set up, you’re ready to start your first remarketing campaign!
See below to see how our’s came out.

This is an example of a completed Facebook Remarketing Ad.
Written by
Liz Townsend is a Client Success Manager at Boingnet. She's all about omnichannel marketing, landing page and microsite design, and conversion optimization. With a background in data analysis & marketing at Epsilon, CSC and an MBA in Marketing from Boston College, she brings a wealth of experience to assist Boingnet clients with campaign success.
